
|
I am going to describe my way of using my Gaggia Classic. It is not the only way but might be a useful guide for those starting off with the Classic for the first time.
I switch on the machine, check the water tank [fill if necessary] and wait until the light comes on for the coffee. This means that the water temperature in the boiler has reached a lower level of the limit, ie about 70 degrees C. At this point, I run a bit of water through the brew head and hold the portafilter [filter holder] under it to warm the holder. I also open the steam wand the steam knob on the right, with the coffee button still on. This draws the water through the steam pipe. Once water comes through the steam wand, I close the wand and stop the coffee button. There will be some drips from the wand. You can release any excess water by opening the steam knob again to release this. I then leave the machine to get up to the max temperature, ie until the light turns off. This means that the coffee thermostat max temperature has been reached. During the time I prepare to grind the coffee and tamp etc. Before I engage the portafilter, with the coffee in the basket, on to the brew head, I press the coffee button, just enough to release a little bit of water. Then I immediately engage the portafilter and press the coffee button again to start the brew for a second or so, and then stop, and then start the brew again after 3 seconds. This is to pre-infuse the coffee with some water. Once I get my desired amount of coffee, I stop the coffee button. Pre-infusion can give you a better coffee, in my opinion.
0 Comments
Modding the Classic is something that has gone on for many years by Gaggia enthusiasts. You may have seen Rancillio Silvia steam wand fitted to the pre-2015 models. This was quite common. This, of course, is no longer necessary as the 2019 Classic has the professional steam wand as standard.
OPV Another common adjustment, rather than a modification, that users carried out on the pre-2015 model was the adjusting of the Over Pressure Valve. On the 2019 model the OPV is on the top of the pump rather than being fitted to the boiler. It is not as easy as the older model. It seems to be a question a lot of enthusiasts seem to ask. I find that enthusiasts somehow find a way of adjusting things on the Classic. As a manufacturer's agent we need to warn against any internal adjustments or modifications as this will invalidate the manufacturer's warranty. The machine's default pressure for opening the solenoid is 9 bar. This is what the factory setting is. This is what you have even on professional machines. It is therefore not necessary to change this unless you want to perform unusual trials . Yes, it can have an impact on achieving different results on coffees depending on the fineness of the grind. I personally am happy changing the grind or the pressure I apply when tamping the coffee or increasing or decreasing the amount of coffee you put in to try out different tastes in coffee. Pre-infusing the coffee also can help. PID Another modification I see done is, fitting a PID controller. This is probably a good thing as it keeps the temperature range at a smaller range – say 85 -90 degrees, rather than the normal of 72 – 92 degrees. Fitting a PID is not something that you can easily do at home. Any modification can invalidate the warranty on the machine. Simple Modifications There are some simple modifications which can make a big difference to the quality of coffee. Two of these simple modifications are fitting a filter seal for the brew head and a professional shower disc. We now have a E61 silicone seal [blue] and a professional shower disc on our website. They are £5 each and they are both excellent. What it does is that it gives a bit more flexibility when you are fitting the portafilter on to the machine. It is easier to fit. You can put 18-19g of coffee in a 16g basket and still manage to fit the portafilter with relative ease because the silicone seal is springy and flexible. The pro shower disc has 2 layers – a metal layer with larger holes and a mesh layer. This allows the water to flow in a more controlled way from the brewhead. Both items are available to buy on this website. If you need further advice, why not come and see us live and talk to us on Zoom. 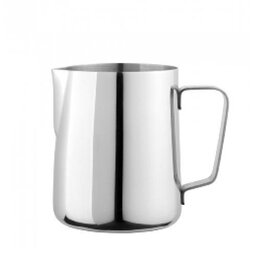 How do I get a good milk froth on a Gaggia Classic 2019 Pro? It is a question I get asked many times. I think some of you are finding it harder than the previous models of the Classic which had the pannerello frothers. The Pannerello Frothers have a simple sleeve that allow air to always go into the milk, when you insert it into the jug. As you probably know, that air is main ingredient in stretching the milk. If you are a person who wants a flat white or a more controlled micro foaming, then the sleeve on a pannerello frother [the one you find on all the other models we do] can be a non starter. I usually take the sleeve off [on a panneello frother] and foam the milk using, just the tip of the wand and get great results. When you do this, you will find that 'you' have to add the air. This will come with practice. I tend to put the tip of the wand [without the sleeve] about an inch into the milk and open the wand fully by rotating the knob fully. The force of the steam will create a depression and a vortex in the milk and the milk should start to go round. The Classic 2019 has the professional steam wand. This means that there is no air added by the frother. It just has the 2 holes on the nipple of the wand and therefore you have to control the air intake. It is therefore similar to foaming without the sleeve on a pannerello frother. If you use the right jug and practice a bit with the directing of the tip and adding of air, you can produce some great results. When I say, using the right jug, I think a lot of users who are used to the pannerello frother find it difficult to change to the Classic 2019 wand because they are trying to use the same jug that they had before and doing it the same way as before. Tips
Milk Jugs Remember, different jugs can give different results. I quite like the straight jugs that we do, as they keep the swirling and gives more control by pushing the milk to the bottom. If you are using a V shaped jug, you will find a different result. There are obviously different sizes available. If you are wanting milk for a one or two cups, the 12oz [350cc] jug is ideal. Once you get used to this, you should be able to get a good micro foamed milk for flat white and latte art. If you add more air you can stretch it to about double the quantity in the jug. If you want a better pour for latte art, then have a look at the Motta Jugs. Let us know how you are getting on. 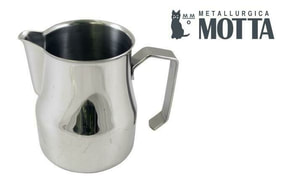 |
Category
All
AuthorHello, my name is Raj Beadle. I am the author of this blog. I am the owner and managing director of Caffe Shop Ltd - Gaggia UK. We represent Gaggia spa in the UK and are the exclusive distributor of Gaggia in the UK. We also directly retail via our website www.gaggiadirect.com and also through our own retail shops. Archives
July 2024
|
 RSS Feed